Adjustment layers: an adjustment layer allows you to make changes to a layer without permanently affecting the layer below it (great for people like me who constantly change their mind). Adjustment layers can change many different aspects of a layer depending on what kind of adjustment layer you choose. 
When you click on the adjustment layer icon in your menu it gives you a drop down menu of the different kinds of adjustment layer options.
Ok before you start getting all mixed up with all the Photoshop talk I’m going to show you one of my favorite things to do with adjustment layers;)
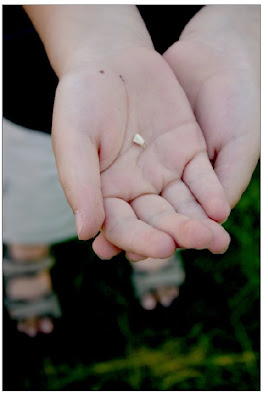
I use this technique almost everyday in some aspect when I proof my photos. I’m not that technical of a photographer and often my first thought is about getting the shot and not so much about what my settings are. So many times when I shoot in the automatic modes I end up with dark pictures like this one:
Not too bad of a picture but it’s on the dark side and there is no pop to the colors. To correct this I’m going to use the levels option in the adjustment layer menu
Click Adjustment layers icon > Levels
This will bring up the Levels menu.
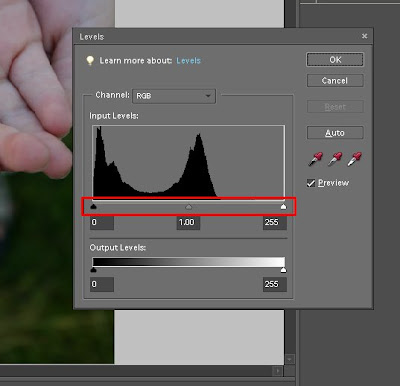
By moving the sliders on the bottom (shown circled in red) of the input levels is what gives a little magic to your photo.
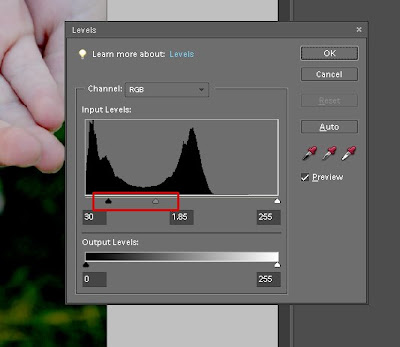
Moving the middle slider to the left brightens up your photos and then moving the left slider to the right a bit afterwards gives you depth back into your photo after you’ve brighten it a touch. How much you move these is going to be a little trial and error as well as your own personal taste, but here is an idea of how much I moved them as well as my after picture.
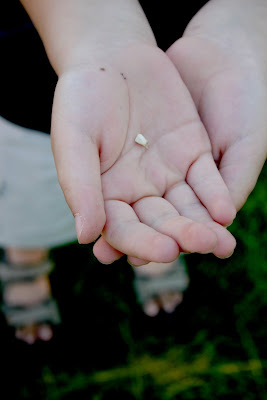
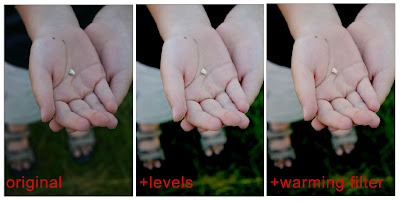
The picture is considerable better, but I still want to brighten it a little and get rid of the blue cast from my photo.
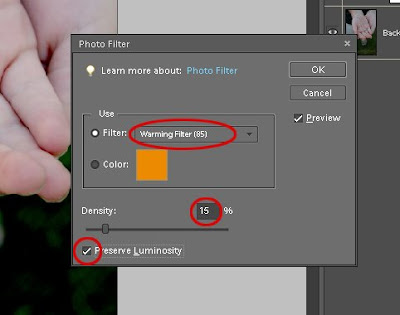
I’m going to click on my Adjustment layers icon again but instead of clicking on levels I’m going to choose the Photo Filter option.
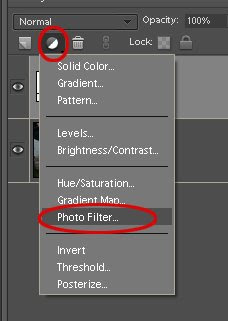
The filter can be changed to many different colors but for this example I’m going to leave it on the Warming Filter. The color is that warm orange color and then I’ll change the density to about 15. Make sure the Preserve Luminosity box is checked and then click ok.
Ahhhhh! Much better:)
The beauty of proofing your photos this way is if you do something and you decide you don’t like it just take that adjustment layer to your little garbage can and you haven’t affected your original picture.
After you've gotten your photo the way you want it just simply Flatten the layers (Layer > Flatten Image) and then save your new photo with a new name. I usually leave mine with the original image number from my camera file and just add (edit) to the end. Saving both the original and the edit next to each other in my computer file.
Here are the three pictures side by side:
Hope you try the technique the next time you want to add a little something to your photos.

5 comments:
Wow, what a great job you did giving us some secrets!!!
Nicole...you rock...I so needed this...I have some great photos that need a little something...thanks for the tips!
Nicole, thanks for this tutorial, I have photoshop and just am learning it and i know there is alot i can do with my photos, etc.
By the way your tutorial is excellent. Thanks again.........
This is SOOO helpful! I'm always trying to brighten my photos! Thanks Nicole!
I cannot wait to try this!
~L
Post a Comment