OK, I was joking with Lynn at CHA about not knowing what to do with the laser cuts in this month's kit when I first saw them. Now, they're my favorite thing in the whole kit! :)
I painted on the 'school of fish' one I used on a previous layout (see my entry from earlier this month). For the 'swim lessons' one, I broke out the ink and UTEE (ultra thick embossing enamel) to give it a wet, shiny look. (That Ranger class at CHA got me all excited about embossing again!)
Here are some quick and easy instructions to follow if you want to acquire the same look for your layouts....
Products: Clear ink, UTEE, heat gun
First, cover the laser cut with clear ink.
Cover the laser cut with UTEE. Note: Move the laser cut to a new piece of paper after inking it so that all of the excess UTEE won't stick to the paper.
Remove the excess UTEE and emboss the enamel with your heat gun.
Note: I applied 2 layers for a thicker, wetter look
Adhere the laser cut to your layout.
Use the paint pen in the therapy kit to color in the words.
Here are the supplies from the July kit that I used to create this layout.
Scrap Kit:
Scenic Route Grafton/Chapman St., Hewitt St.
Core’dinations Cardstock: February Gold
Scrapbook 101 laser cut – swim lessons
Therapy Kit:
Paint Marker: Clementine
Add on Kit:
Scenice Route Grafton/Laxton Ave.
Sunday, July 27, 2008
Another fun way to alter July's laser cuts
Saturday, July 26, 2008
Changing the color of digital elements
Now there is a couple of ways to change the color of digital elements you already have (a great way of getting more bang for your buck!). Which method you use all depends on the range of colors. For fonts and single colored elements I use this quick and easy method
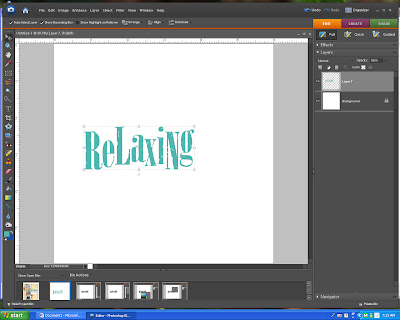
The letters I used for my title are Lisa Sisnero’s Cracked Rub-on Alphabet that can be found at http://www.littledreamerdesigns.com/. After opening each letter I dragged it to my document
 When you get each letter positioned you are going to merge the layers into one layer.
Layer>Merge Down or Ctrl-E. Start at the top of the letter stack and hit Ctrl-E until all the layers are merged onto one layer. This will give you all the letters on one layer without merging it to the background.

-If working in Elements you can hold down the Control key and click on all the layers and then right click and hit ‘merge layers’
From here you are going to change your foreground color to the color you want to change your letters. Edit>Fill Layer. On the menu make sure you put in as your options - foreground color and click on the ‘Preserve Transparency box’.
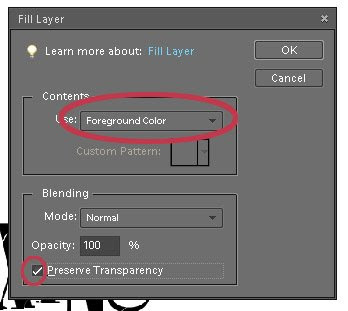
The Preserve Transparency is what allows you to change colors; it fills in your element with a single layer of color and leaves the rest of the layer exactly what it says - transparent.
Now click ok. My letters are now a nice teal color to match what is going on in my layout.
and my finished results.
 Coming next month: a series about adjustment layers - the best thing since sliced bread!
Sunday, July 20, 2008
Flower Garden 2008 - Using those scraps

Thursday, July 17, 2008
Summer Card and Rave

Painting the laser cuts in July's kit
The laser cuts in the July kit are so fun and versatile. You can change their appearance and use them as an embellishment on your layout, or use them as a mask to create a different look. The "school of fish" laser cut complimented the theme of my beach layout and I painted it with the MM acrylic paint in July's kit to match the colors in my layout.
"Summertime critters"
Holly Pittroff
I painted the majority of the laser cut with the Making Memories Funky Vintage Chartreuse acrylic paint from the July kit. I love the way this paint compliments small sections of the kit's Scenic Route paper line. Way to go Lynn!

I painted one of the fish with the EK Success paint marker – Clementine from the kit. This cooredinated great with the color in the title.
To finish it up, I added some detail with a Sharpie pen and some brads from previous rockin' IAAS kits. :) This layout was super fun to make. I can't wait to see what everyone else does with their laser cuts this month.
Happy scrappin'!
Summertime critters supplies
Coredinations Cardstock – Poseidon
Scenic Route Grafton/James Street
Scenic Route Redmond Stencil letters
Scrapbook 101 Laser Cut – School of Fish
Inque Boutique Cabana Printed Chipboard Circle
Fancy Pants Rough and Tough pins
Making Memories Funky Vintage Chartreuse acrylic paint
EK Success paint marker – Clementine
Brads
Brown Sharpie pen
Tuesday, July 15, 2008
Out From Behind the Camera layouts from the DT!
Here is Alicia's amazing 'Out from Behind the Camera Series' sketch for July. Thanks Alicia for another rockin' sketch!
Here are some of IAAS DT members' take on the sketch.
"Chillaxin'"
Kary Lewis
"cruisin"
Marci Knecht
closeup
"my bliss"
Holly Pittroff
"get out"
Laura Achilles
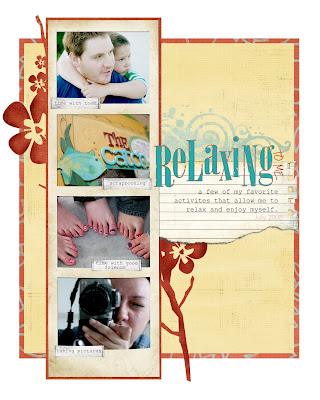
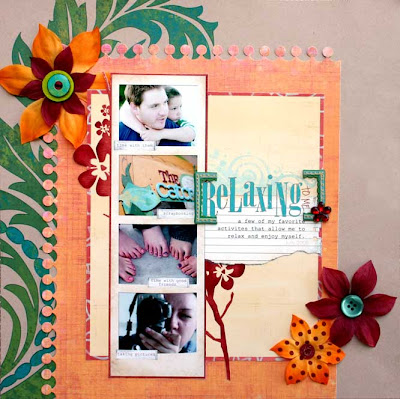
"Relaxing"
Nicole Stark
Take the OFBC sketch challenge, post it the Out From Behind the Camera Series section of the gallery.
Happy Scrappin'!
Monday, July 14, 2008
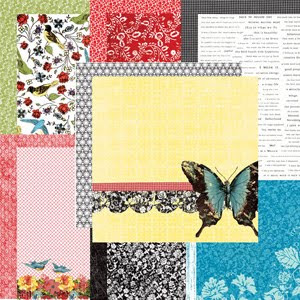
Core'dations Cardstock
If your a Bazzill lover then your going to just love everything about Core'dations cardstock. It is nice heavy cardstock that is also textured but it has a lighter core. Not exactly white but a lighter color of the actual cardstock color. Which will help with added effects or to make your own background. Here are a few cards showing the sanding technique.

Sunday, July 13, 2008
Scenic Route Journaling Die Cuts
The Scenic Route Journaling Die Cuts in this months kit are so versatile and easy to use. You can easily add them to any layout, using them traditionally for a quick journaling spot or get a little creative and use them on cards, as tags or even create a unique mini book.
I've taken one of the die cuts, cut it in half and used it as the background for my sentiment on this card.
Show us your creative uses for these fun die cuts by uploading your projects into the IAAS gallery! =) Mary Jo

Friday, July 11, 2008
Altered Star in July kit...so unique!
There are so many options with this 12" tin star from Melissa Frances!! Alicia altered her star to make a "welcome sign" for her home. Too cute! I decided to create a baseball decor item for my son's room. Here are the step-by-step instructions showing how I made it. 
I used ZipDry adhesive on my project. It only took about a minute for my paper/picture to adhere to the metal. 

Then I cut my excess paper away with an exacto knife.
For those of you who like to pre-cut paper pieces before adhering, here are the dimensions of the star angles.
After placing my paper, I selected pictures of my son playing baseball for some of the vertical star angles. 
When selecting pictures for this, you need to account for the narrowing parts of the angles. Print extra background at the top and bottom of your photo.
I applied a chipboard title to my star using ZipDry. 
I wanted to complete my title using a chipboard star in the middle. 
I covered the chipboard star with Core'dinations cardstock....
and cut the word "star" out of cardstock using my Cricut. I used ZipDry to adhere the word to the star. 
I used ZipDry and a pop-up dot to secure the smaller star to the center of the metal star. Here's another picture of the completed project. Have fun making your star!
Items from the July Kit used:
Scenic Route Grafton/Tyson Street, Maxwell Avenue, Kennedy Street
Core'dinations Cardstock - February Gold
Scenic Route Redmond Stencil chipboard letters
Melissa Frances 12" Tin Star
Thursday, July 10, 2008
Having fun with July's Kit
When I opened my kit, I was immediately drawn to the surfboard paper--being a "beach family", I knew that I would definitely use this paper on all of my beach pics---but then I realized that the surfboards could be hand-cut to look like the petals of a flower--so I got my crafty little Fiskars knife out and started cutting away--and here is one example of a flower I made with the surfboards--I just added a bit of crystal lacquer to the "petals", arranged them in a flower shape, added a button and a brad from the kit, some "puffy paint", and I have a really cute flower to add to my layout--
I hope you like this technique and try it out for yourself!!

Happy Scrapping!!
~~Kary
Wednesday, July 9, 2008
Altered Star


If you got the therapy kit this month, and I know lots of you did, since it is now sold out, you will have recieved one of these metal stars. They don't take much effort at all to turn them into a very cute home decor item. I made mine into a welcome sign for my front door. Simply cover each point of the star with a different patterned paper and you have almost all the decoration need. I added some lettering, and some cut our circles from matching paper which I layered with foam dots. Some hanging stars and it was ready to hang.
Tuesday, July 8, 2008
You have to love this kit!

This may very well be the BEST ever kit from IAAS. There is so much paper that even after making 3 layouts and 4 cards, I still have a ton of product left. What I love the most about this months kit is that everything is so perfectly coordinated and everything really does go with everything else. Making cards with this months kit was a breeze, and I love the Journalling Die Cuts, they're so versatile. This months kit was a home run in my book!
Wednesday, July 2, 2008
July Little Pill Sand Bucket album!


I used one of the tags from the Inque Boutique Cabana Chipboard Sheets to create my "boogie board".

The castle is from the Inque Boutique Cabana Chipboard Sheets. I mixed acrylic paint and DecoArt Sandstone Medium and painted the castle with this mixture. As it was drying I placed small broken parts of seashells we brought back from the beach on it. I tried to make it look like the castle my kids actually build at the beach - so fun! This was actually DH's idea...

I cut out my words from the KI Memories Journaling "hazard" paper in the scrap kit.

Don't feel like you have to use the Maya Road journaling card JUST for journaling. I used one on this page as an accent.
Products used from July IAAS kits:
Scenic Route Grafton/Maxwell Ave., Chapman St., Laxton Ave., Kennedy St., Tyson St., James St.,Bowtell Ave., Carr St., Kraft Surf Leaf
KI Memories Lace Journal paper: hazard
Coredinations Cardstock: Crab Grass, February Gold
American Crafts ribbon
Inque Boutique Cabana Printed Chipboard Circles
Cloud 9 Summer Fun words
Glitz Bubbles Roller Doodle stamp
Inque Boutique Cabana Chipboard
Maya Road Sheer Scallop journaling cards
Daisy D's fresh flower
MM Funky Vintage Chartreuse paint
Doodlebug Crushed velvet brads
EK Success Sand Pail Chipboard book
TFL!