Wednesday, April 23, 2008

and even more cards


I really loved the Heidi Swapp Ghost flowers and the subtle blue on blue. With a little added white as a border it made the butterflies (which were cut from the ribbon) pop. Very simple card that didn't take to long to make at all.

Thursday, April 17, 2008

The perfect kit for Cards


If you're a cardmaker, or even if you aren't, this months kit is perfect for cardmaking. The paper is great for a variety of occasions, and so pretty that you'll want to use every scrap. The sheet with the "tags" makes it really easy to make a great looking card in no time. Add some ribbon, a little Stickles and you're done!

Wednesday, April 16, 2008

What a Kit!

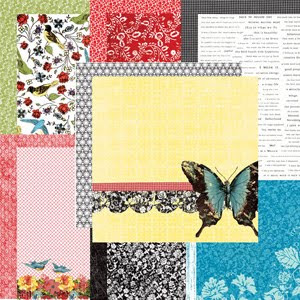
If those birthday pictures have just been piling up and you need come inspiration to get scrappin', the April kit is for you! It's loaded with birthday products and then some!
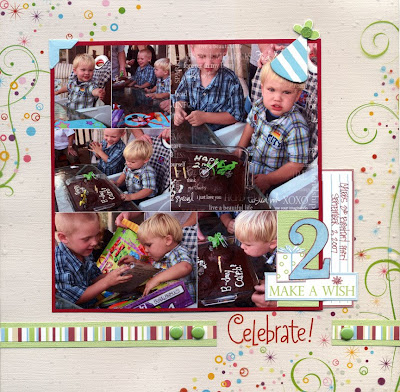
Here's a layout I made using the kit.


Title: turning 5
Holly Pittroff


Scrap Kit:
Dream Street Everyday Celebrations-Make a Wish, Something Blue
Bazzill Bling Cardstock
American Craft Thickers – White poolside
Heidi Swapp Ghost flowers
American Crafts Clubhouse Celebrations chipboard
Inkssentials White Pen

Addict Kit:
Fancy Pants Glitter cuts – blue frame
Clearsnap Azurite inkpad
American Crafts Blue Slick Writer

Therapy Kit:
Bazzill Bling brad
American Crafts ribbon

Tuesday, April 15, 2008

Out From Behind the Camera

Here is your challemge for April. Nice and simple one. Scrap about what makes you smile. That's it. I told you it would be easy. Now, surely EVERYONE can scrap about that.
Here's the sketch:

...and my sample:

Monday, April 14, 2008

Grandma's Brag Book


Grandma's Brag Book
By Alicia Barry

I got a very cute mini album to work on this onth. I have made it into a brag book for Granma for her birthday coming up. I punched somoe extra holes in the scallops for a lacy effect. The cropodile wne through it so easily. I also put brads right through the clear plastic bag. I also punched holes in the side of the bag and tied ribbons to hold the whole thing together.

Tuesday, April 8, 2008

Let's Celebrate Card


This months kit was so much fun to work with.


For the card I just simply used the cut out pieces of the paper for the red border. The candles were perfect. And as a finished touch I adhered the white ribbon. And also a few doodles just for added fun.


For the envelope I used the same paper cutouts for the circle flower. It works great if you have a punch of that size....I did not so I just cut around the dots and inserted my brad. For the back of the envelope (to close it) I used a small velcro sticker.

Monday, April 7, 2008

April's Hybrid Tutorial

Creating a Photo Overlay with Text Paper

As soon as my April kit came in the mail I couldn’t wait to turn this printed pattern paper into a photo overlay. By following a few easy steps you can create the same effect with any text paper (digital or scanned).

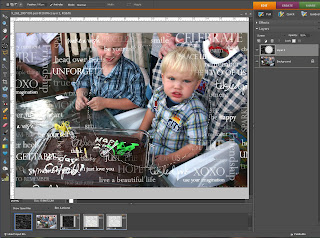
Photoshop 7.0 & Elements 6.0:
File > Import, using your scanner scan the word paper from the April kit.

Elements 6.0: Go to Enhance > Adjust Color > Remove Color.
Photoshop 7.0: Got to Image > Adjustments > Desaturate


If the pattern in your image is dark and the background light:
Elements 6.0: go to Filter > Adjustments > Invert.
Photoshop 7.0: go to Image > Adjustments > Invert

Elements 6.0: go to Enhance > Adjust Lighting > Brightness/Contrast
Photoshop 7.0: Image > Adjustments > Brightness/Contrast
-move the contrast slider to the right until you have a high amount of contrast to your paper.

Elements 6.0: Using the move tool click and drag your paper onto the thumbnail of the photo in your photo bin.
Photoshop 7.0: Click and drag your paper onto your opened photo.


At the top of the layers palette click on the Normal drop down menu and select Screen to set your patterned paper to the screen blending mode.
Select the Elliptical Marquee tool. In the options bar at the top of your screen type 100 in the feather box. Making sure your pattern paper layer is selected, hold down shift as you click and drag a circle over your photo subject. Hit delete to erase the pattern paper you just selected.

another example using a beautiful text (digital) paper by Katie Pertiet (http://www.designerdigitals.com/).


Now Flatten Image (Layer > Flatten Image) and save as a jpeg. From here you can either print it out on your printer at home or send to an online printing service. Be sure to share with all of us over at IAAS gallery so we can oooh and ahhhh.


Tuesday, April 1, 2008

Celebrate!

That is the theme for this month!
We're celebrating our 2nd anniversary!
We're celebrating Spring.
And this month both of my children will be celebrating their birthdays.

A few kit highlights:

It seems very fitting that we have Dream Street Papers Everyday Celebrations in the Scrap Kit. These papers are double sided and include a sheet that you can cut items out or use the backside as a whole. Love that. And Dana Morin (she designed the paper line) included some of the cutest little items on the cut-out sheet.

The kits are filled with items to scrap any celebration events from birthdays to just everyday happenings in life. The chipboard from American Crafts is so easy and versatile to use. You can write or doodle on them with the pens, layer them, paint them, sand them...the possibilities are endless. Watch to see what the design team does with them.

Fancy Pants Designs has created some of the cutest Glitter Cuts that coordinate wonderfully with the paper. The embossed paper dragonflies from Prima are so cute, and they can be used as it or highlighted by swiping the inkpad over the top...or flip them over and swipe the inkpad across the surface for a different effect.

The details on Queen and Company Felt Frenzy items are amazing and they are self adhesive so there is no worring about using the right glue or if it will soak through.

The black chipboard album comes with a clear bag that you will need to remove the protective coating from both sides. The bag can be altered with rub-ons, pens, or stamped on by wiping with Ranger's Alcohol Blending Solution first. The album pages can be covered with paper or used as is...or something in between.

I'm looking forward to seeing what everyone does with the kits.

Be sure to check out the message board for details about our celebration events going on all month long.